之前的文章<<VMware vSphere平台端口镜像 >>介绍了VMware vSphere环境下虚拟交换机的端口镜像机制,本文来介绍在OpenvSwitch环境中如何实现端口镜像。
OVS上实现端口镜像的基本流程如下:
创建mirror,在mirror中指定镜像数据源及镜像目的地
将创建的mirror应用到bridge中
镜像数据源可以通过下面几个选项来指定:
select_all: 布尔值,设置为true时,进出该mirror所生效的bridge上的每个数据包都将被镜像select_dst_port: 从该port离开虚拟交换机的数据包将会被镜像,从Guest角度看是Guest网络接口的流入方向select_src_port: 从该port进入虚拟交换机的数据包将会被镜像,从Guest角度看是Guest网络接口的流出方向select_vlan: 指定特定VLAN做为数据源,整个VLAN的数据包都会镜像到目的地
镜像目的地可以用下面选项来指定:
output_port: 将数据包镜像到特定的portoutput_vlan: 将数据包镜像到指定VLAN, 原始数据的VLAN tag会被剥掉。若镜像多个VLAN到同一个VLAN,没有办法区分镜像后的数据包来源于哪个VLAN。
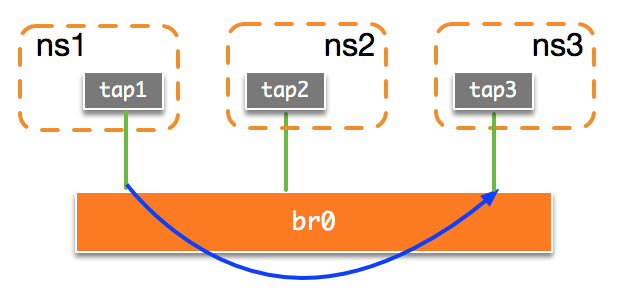
下面我们通过实例来说明OVS上的镜像机制。我们的第一个实验拓朴结构如下图,我们将流入tap1网络接口的数据包镜像到tap3中:
首先构造环境:
1
2
3
4
5
6
7
8
9
10
11
12
13
14
15
ovs-vsctl add-br br0 ovs-vsctl add-port br0 tap1 -- set interface tap1 type =internal ovs-vsctl add-port br0 tap2 -- set interface tap2 type =internal ovs-vsctl add-port br0 tap3 -- set interface tap3 type =internal ip netns add ns1 ip netns add ns2 ip netns add ns3 ip link set dev tap1 netns ns1 ip link set dev tap2 netns ns2 ip link set dev tap3 netns ns3 ip netns exec ns1 ip addr add 10.10.10.11/24 dev tap1 ip netns exec ns1 ip link set up tap1 ip netns exec ns2 ip addr add 10.10.10.12/24 dev tap2 ip netns exec ns2 ip link set up tap2 ip netns exec ns3 ip link set up tap3
我们从ns1中PING ns2的IP:
1
2
3
4
5
6
7
8
[root@centos3 vagrant]# ip netns exec ns1 ping 10.10.10.12 -c 2 PING 10.10.10.12 (10.10.10.12) 56(84) bytes of data. 64 bytes from 10.10.10.12: icmp_seq=1 ttl=64 time=0.060 ms 64 bytes from 10.10.10.12: icmp_seq=2 ttl=64 time=0.106 ms --- 10.10.10.12 ping statistics --- 2 packets transmitted, 2 received, 0% packet loss, time 1000ms rtt min/avg/max/mdev = 0.060/0.083/0.106/0.023 ms
在ns3中运行tcpdump观察是否能收到数据包, 可以看到此时ns3的tap3并不会收到tap1访问tap2的数据包:
1
2
3
4
5
6
7
8
[root@centos3 vagrant]# ip netns exec ns3 tcpdump -i tap3 -e -nn icmp or arp tcpdump: WARNING: tap3: no IPv4 address assigned tcpdump: verbose output suppressed, use -v or -vv for full protocol decode listening on tap3, link-type EN10MB (Ethernet), capture size 65535 bytes ^C 0 packets captured 0 packets received by filter 0 packets dropped by kernel
接下来我们创建了相应的mirror, 并将其应用到br0上:
1
2
3
4
ovs-vsctl -- --id =@tap1 get port tap1 \ -- --id =@tap3 get port tap3 \ -- --id =@m create mirror name=m0 select_dst_port=@tap1 output_port=@tap3 \ -- set bridge br0 mirrors=@m
此时查看OVS上的mirror:
1
2
3
4
5
6
7
8
9
10
11
[root@centos3 vagrant]# ovs-vsctl list mirror _uuid : 98b89127-cf94-4926-8d5f-76145154b03c external_ids : {} name : "m0" output_port : 1dcde312-e33d-439f-b646-9db92416a586 output_vlan : [] select_all : false select_dst_port : [16db4055-5b5b-411d-8e98-87813ba14eff] select_src_port : [] select_vlan : [] statistics : {tx_bytes=0, tx_packets=0}
再次进行PING实验:
1
2
3
4
5
6
7
8
[root@centos3 vagrant]# ip netns exec ns1 ping 10.10.10.12 -c 2 PING 10.10.10.12 (10.10.10.12) 56(84) bytes of data. 64 bytes from 10.10.10.12: icmp_seq=1 ttl=64 time=0.274 ms 64 bytes from 10.10.10.12: icmp_seq=2 ttl=64 time=0.341 ms --- 10.10.10.12 ping statistics --- 2 packets transmitted, 2 received, 0% packet loss, time 1000ms rtt min/avg/max/mdev = 0.274/0.307/0.341/0.037 ms
在ns3上抓包可以看到成功获得tap2回应tap1的ICMP响应数据包:
1
2
3
4
5
6
7
8
9
10
11
[root@centos3 vagrant]# ip netns exec ns3 tcpdump -i tap3 -e -nn icmp or arp tcpdump: WARNING: tap3: no IPv4 address assigned tcpdump: verbose output suppressed, use -v or -vv for full protocol decode listening on tap3, link-type EN10MB (Ethernet), capture size 65535 bytes 23:22:11.919448 26:1e:74:67:6c:cc > 16:fe:12:ad:f0:4f, ethertype IPv4 (0x0800), length 98: 10.10.10.12 > 10.10.10.11: ICMP echo reply, id 4411, seq 1, length 64 23:22:12.919823 26:1e:74:67:6c:cc > 16:fe:12:ad:f0:4f, ethertype IPv4 (0x0800), length 98: 10.10.10.12 > 10.10.10.11: ICMP echo reply, id 4411, seq 2, length 64 23:22:16.929503 26:1e:74:67:6c:cc > 16:fe:12:ad:f0:4f, ethertype ARP (0x0806), length 42: Request who-has 10.10.10.11 tell 10.10.10.12, length 28 ^C 3 packets captured 3 packets received by filter 0 packets dropped by kernel
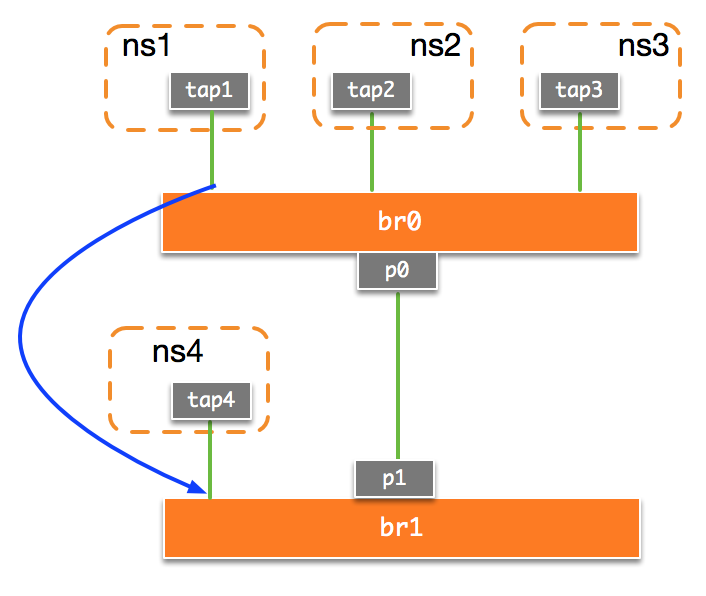
这种方式对应了Cisco的SPAN方式, 下面我们来实验RSPAN方式。我们将拓朴修改为如下图所示,我们首先在br0上将tap1的数据包镜像到物定VLAN: 111, 在br1上再从VLAN: 111中将数据包镜像到tap4:
准备拓朴:
1
2
3
4
5
6
7
ip link add p0 type veth peer name p1 ovs-vsctl add-port br0 p0 ovs-vsctl add-port br1 p1 ovs-vsctl add-port br1 tap4 -- set interface tap4 type =internal ip netns add ns4 ip link set tap4 netns ns4 ip netns exec ns4 ip link set up tap4
关闭VLAN:111的MAC学习功能,避免影响正常网络转发:
1
2
ovs-vsctl set bridge br0 flood_vlans=111 ovs-vsctl set bridge br1 flood_vlans=111
首先创建一个mirror将tap1的数据包镜像到VLAN:111:
1
2
3
ovs-vsctl -- --id =@tap1 get port tap1 \ -- --id =@m create mirror name=m1 select_src_port=@tap1 output_vlan=111 \ -- set bridge br0 mirrors=@m
查看OVS上的mirror:
1
2
3
4
5
6
7
8
9
10
11
[root@centos3 vagrant]# ovs-vsctl list mirror _uuid : fd39fdb2-ab69-47c1-bde9-01b7b40dd4d3 external_ids : {} name : "m1" output_port : [] output_vlan : 111 select_all : false select_dst_port : [] select_src_port : [16db4055-5b5b-411d-8e98-87813ba14eff] select_vlan : [] statistics : {tx_bytes=13426, tx_packets=157}
再次从tap1发送PING包到tap2, 我们在tap4上抓包, 可以看到tap4上可以收到镜像的数据包:
1
2
3
4
5
6
7
8
9
10
[root@centos3 vagrant]# ip netns exec ns4 tcpdump -i tap4 -e -nn icmp or arp tcpdump: WARNING: tap4: no IPv4 address assigned tcpdump: verbose output suppressed, use -v or -vv for full protocol decode listening on tap4, link-type EN10MB (Ethernet), capture size 65535 bytes 14:45:58.762260 16:fe:12:ad:f0:4f > 26:1e:74:67:6c:cc, ethertype 802.1Q (0x8100), length 102: vlan 111, p 0, ethertype IPv4, 10.10.10.11 > 10.10.10.12: ICMP echo request, id 9722, seq 1, length 64 14:45:59.806203 16:fe:12:ad:f0:4f > 26:1e:74:67:6c:cc, ethertype 802.1Q (0x8100), length 102: vlan 111, p 0, ethertype IPv4, 10.10.10.11 > 10.10.10.12: ICMP echo request, id 9722, seq 2, length 64 ^C 2 packets captured 2 packets received by filter 0 packets dropped by kernel
此时,tap4为trunk模式,所有VLAN的数据包都可以收到。我们将tap4的tag设置为111:
1 ovs-vsctl set port tap4 tap=111
此时,再次重复PING访问,tap4上依然可以收到镜像的数据包, 只不过VLAN TAG已经被剥除:
1
2
3
4
5
6
7
8
9
10
[root@centos3 vagrant]# ip netns exec ns4 tcpdump -i tap4 -e -nn icmp or arp tcpdump: WARNING: tap4: no IPv4 address assigned tcpdump: verbose output suppressed, use -v or -vv for full protocol decode listening on tap4, link-type EN10MB (Ethernet), capture size 65535 bytes 14:47:24.060144 16:fe:12:ad:f0:4f > 26:1e:74:67:6c:cc, ethertype IPv4 (0x0800), length 98: 10.10.10.11 > 10.10.10.12: ICMP echo request, id 9816, seq 1, length 64 14:47:25.117508 16:fe:12:ad:f0:4f > 26:1e:74:67:6c:cc, ethertype IPv4 (0x0800), length 98: 10.10.10.11 > 10.10.10.12: ICMP echo request, id 9816, seq 2, length 64 ^C 2 packets captured 2 packets received by filter 0 packets dropped by kernel
我们再次将tag设置为110,再次从tap4抓包则收不到数据包。
我们可以添加另一个镜像规则,将镜像VLAN的数据包镜像到tap4:
1
2
3
ovs-vsctl -- --id =@tap4 get port tap4 \ -- --id =@m create mirror name=m2 select_vlan=111 select_all=true output_port=@tap4 \ -- add bridge br1 mirrors @m
查看OVS上的mirror:
1
2
3
4
5
6
7
8
9
10
11
12
13
14
15
16
17
18
19
20
21
22
[root@centos3 vagrant]# ovs-vsctl list mirror _uuid : e758d8ae-408d-4e4f-a1c4-eaa8dd99bce5 external_ids : {} name : "m2" output_port : e6a7d9b6-1032-4f9a-84f1-54b69f6db315 output_vlan : [] select_all : true select_dst_port : [] select_src_port : [] select_vlan : [111] statistics : {tx_bytes=0, tx_packets=0} _uuid : fd39fdb2-ab69-47c1-bde9-01b7b40dd4d3 external_ids : {} name : "m1" output_port : [] output_vlan : 111 select_all : false select_dst_port : [] select_src_port : [16db4055-5b5b-411d-8e98-87813ba14eff] select_vlan : [] statistics : {tx_bytes=14378, tx_packets=169}
在tap4上抓包, 得到的数据包已经被剥掉VLAN TAG:
1
2
3
4
5
6
7
8
9
10
[root@centos3 vagrant]# ip netns exec ns4 tcpdump -i tap4 -e -nn icmp or arp tcpdump: WARNING: tap4: no IPv4 address assigned tcpdump: verbose output suppressed, use -v or -vv for full protocol decode listening on tap4, link-type EN10MB (Ethernet), capture size 65535 bytes 14:50:37.842958 16:fe:12:ad:f0:4f > 26:1e:74:67:6c:cc, ethertype IPv4 (0x0800), length 98: 10.10.10.11 > 10.10.10.12: ICMP echo request, id 10044, seq 1, length 64 14:50:38.904391 16:fe:12:ad:f0:4f > 26:1e:74:67:6c:cc, ethertype IPv4 (0x0800), length 98: 10.10.10.11 > 10.10.10.12: ICMP echo request, id 10044, seq 2, length 64 ^C 2 packets captured 2 packets received by filter 0 packets dropped by kernel
使用镜像到物定VLAN的方式会导致原始的VLAN TAG信息丢失,如果要镜像多个VLAN的数据到同一目的地则会造成混乱。这种场景下,最好将数据包镜像到一个GRE port,基于这种方式可以实现ERSPAN模式。
清除mirror设置:
1
2
ovs-vsctl clear bridge br0 mirrors ovs-vsctl clear bridge br1 mirrors
添加一个GRE端口:
1 ovs-vsctl add-port br0 gre0 -- set interface gre0 type =gre options:key=0x1111 options:remote_ip=10.95.30.43
创建mirror将tap1的数据包镜像至GRE端口:
1
2
3
4
ovs-vsctl -- --id =@tap1 get port tap1 \ -- --id =@gre0 get port gre0 \ -- --id =@m create mirror name=m3 select_src_port=@tap1 output_port=@gre0 \ -- set bridge br0 mirrors=@m
查看mirror:
1
2
3
4
5
6
7
8
9
10
11
[root@centos3 vagrant]# ovs-vsctl list mirror _uuid : 3c63e590-d42c-454a-a7f9-baa3e0ebb77f external_ids : {} name : "m3" output_port : e71af801-289f-466b-9f66-d1e5cf396233 output_vlan : [] select_all : false select_dst_port : [] select_src_port : [16db4055-5b5b-411d-8e98-87813ba14eff] select_vlan : [] statistics : {tx_bytes=0, tx_packets=0}
我们在外网出口eth0上抓包,可以看到,GRE数据包已经发送:
1
2
3
4
5
6
7
8
9
[root@centos3 vagrant]# tcpdump -ieth0 -nn -e proto gre tcpdump: verbose output suppressed, use -v or -vv for full protocol decode listening on eth0, link-type EN10MB (Ethernet), capture size 65535 bytes 15:46:50.236791 08:00:27:6b:57:88 > 52:54:00:12:35:02, ethertype IPv4 (0x0800), length 140: 10.0.2.15 > 10.95.30.43: GREv0, key=0x1111, proto TEB (0x6558), length 106: 86:5e:7a:ba:4a:5f > e2:ee:06:10:cb:70, ethertype IPv4 (0x0800), length 98: 10.10.10.11 > 10.10.10.12: ICMP echo request, id 1941, seq 1, length 64 15:46:51.237935 08:00:27:6b:57:88 > 52:54:00:12:35:02, ethertype IPv4 (0x0800), length 140: 10.0.2.15 > 10.95.30.43: GREv0, key=0x1111, proto TEB (0x6558), length 106: 86:5e:7a:ba:4a:5f > e2:ee:06:10:cb:70, ethertype IPv4 (0x0800), length 98: 10.10.10.11 > 10.10.10.12: ICMP echo request, id 1941, seq 2, length 64 ^C 2 packets captured 2 packets received by filter 0 packets dropped by kernel
最后需要注意一点,我们的实验是在VirtualBox虚拟机中完成的,VirtualBox的底层虚拟网络基础设施不支持GRE协议,因而实际的GRE数据包并不能到达宿主机并发送到目的地,因而我们选择在本地出口网卡处来抓包。